
![[br]](/mwf/flags/br.png "Brazil")
Hi, i tryed export 3D objects to openclonk, but i don't know how do it.
The guide in the forum is not easy to me.
Can someone do a Video Tutorial exporting this object to openclonk?
http://www.clonkforge.net/projects/project1473/Uzi.rar
Is very dificult working 3d objects, please help me.
The guide in the forum is not easy to me.
Can someone do a Video Tutorial exporting this object to openclonk?
http://www.clonkforge.net/projects/project1473/Uzi.rar
Is very dificult working 3d objects, please help me.
![[de]](/mwf/flags/de.png "Germany")
It can be easily exported using Blender and the Blender2Ogre scripts (http://www.ogre3d.org/tikiwiki/tiki-index.php?page=blender2ogre). Maybe the only "difficult" part was merging the different submeshes to one mesh object within blender, but then it's good to export. I zipped the .ocd for you: https://www.dropbox.com/s/8b5tki9mkdub3fv/Uzi.ocd.zip?dl=1 . Here's what the raw model looks like:
Notice that this model has lots of materials on it (14 in total), but no textures, and only like 2 of them are used in the model, but the modeler exported them anyway. Also, you should tweak the material settings, because some settings in the .material scripts are unnessecary and not supported by the OpenClonk engine anyways.
Notice that this model has lots of materials on it (14 in total), but no textures, and only like 2 of them are used in the model, but the modeler exported them anyway. Also, you should tweak the material settings, because some settings in the .material scripts are unnessecary and not supported by the OpenClonk engine anyways.
Thanks a lot for the help. I exported the 3d object. I can see the object in openclonk, but if the clonk carry it, the carry animation don't start. The object is invisible. I add the armature, but there is a problem.
What is my falt? Can you help me?
Here is the blender 3d object and the openclonk object.
http://www.clonkforge.net/projects/project1473/Uzi.rar
What is my falt? Can you help me?
Here is the blender 3d object and the openclonk object.
http://www.clonkforge.net/projects/project1473/Uzi.rar
Whoa, this was a wild ride until the end. First, I deleted the whole script in the object and did a simple
this is inside the Clonk.ocd (line 393), where they attach the weapon's mesh to the clonk. Interestingly, when carring the Uzi, the
So, somehow it tried to attach the mesh, but it returned
So, they have explicit names for the bones they alter. Looking further up in the function revealed where that bone name is coming from:
So, here they give you the option to let your object return a speciific carry bone name. Looking at your blender model (without that I would have never figured it out), you named your bone "Main", while the original shotgun named in "main". So, I changed the Uzi script to:
And violá, it shows properly. Note however, that your original model is flipped downwards, you might want to fix this.
I think from that, you can start working again. I saw in your original script that you mixed several scripts (arrow scripts, bow scripts, and musket script), which was a bit weird though.
#include Musket, but it still showed nothing. Debugging this further revealed these lines of code: else if(iAttachMode == CARRY_Musket)
{
if(HasHandAction(sec, 1) && !sec)
{
iHandMesh[sec] = AttachMesh(obj, "pos_hand2", bone, trans);
PlayAnimation("CarryMusket", 6, Anim_Const(0), Anim_Const(1000));
fBothHanded = 1;
}
else
iHandMesh[sec] = AttachMesh(obj, pos_back, bone2, trans);
}this is inside the Clonk.ocd (line 393), where they attach the weapon's mesh to the clonk. Interestingly, when carring the Uzi, the
iHandMesh array shows this:-> Clonk::iHandMesh
= [nil, 0]So, somehow it tried to attach the mesh, but it returned
nil. If you read the documentation about the AttachMesh() function here, you'll see the signature as int AttachMesh(any mesh, string parent_bone, string child_bone, array transformation, int flags, int attach_number);
mesh:
ID or object of the mesh to be attached.
parent_bone:
Bone of the calling object's mesh at which to fix the mesh to be attached.
child_bone:
Bone of the object to be attached with which to fix it.So, they have explicit names for the bones they alter. Looking further up in the function revealed where that bone name is coming from:
func DoUpdateAttach(bool sec)
{
  var obj = GetHandItem(sec);
  var other_obj = GetHandItem(!sec);
  if(!obj) return;
  var iAttachMode = obj->~GetCarryMode(this);
  if(iAttachMode == CARRY_None) return;

  if(iHandMesh[sec])
  {
    DetachMesh(iHandMesh[sec]);
    iHandMesh[sec] = 0;
  }

  var bone = "main";
  var bone2;
  if(obj->~GetCarryBone())  bone  = obj->~GetCarryBone(this);
  if(obj->~GetCarryBone2()) bone2 = obj->~GetCarryBone2(this);
So, here they give you the option to let your object return a speciific carry bone name. Looking at your blender model (without that I would have never figured it out), you named your bone "Main", while the original shotgun named in "main". So, I changed the Uzi script to:
/* Uzi */

#include Musket

public func GetCarryBone()  {  return  "Main";  }
And violá, it shows properly. Note however, that your original model is flipped downwards, you might want to fix this.
I think from that, you can start working again. I saw in your original script that you mixed several scripts (arrow scripts, bow scripts, and musket script), which was a bit weird though.
wow, you found my error. The "Main" was the big vilain. You help me a lot, thanks and thanks.
That was my first time importing a 3d model to openclonk.
You are right about the script. I was mixing every thing trying to import the object.
It is not easy to me because i am not a programmer.
When I finish the object i will post to you assess.
That was my first time importing a 3d model to openclonk.
You are right about the script. I was mixing every thing trying to import the object.
It is not easy to me because i am not a programmer.
When I finish the object i will post to you assess.
I do not know how far you are with converting the objects, but maybe you want to build on the shooter library? Getting weapons displayed is fairly simple there.
 Here is the offical guide btw: http://wiki.openclonk.org/w/Exporting_Blender_Models
I was using this guide, but it didn't help me in this problem.
Sometimes a personal support as given by "gamer" is more useful.
Sometimes a personal support as given by "gamer" is more useful.
I used that guide again because of the change in the coordinate space. What I am missing from this tutorial is the information how the coordinate system is set up now. Where do the x, y, z axes that are displayed in blender point to if I use the model ingame? My naive thought was that x and y point to the engine x and y-direction, and z points toward the player.
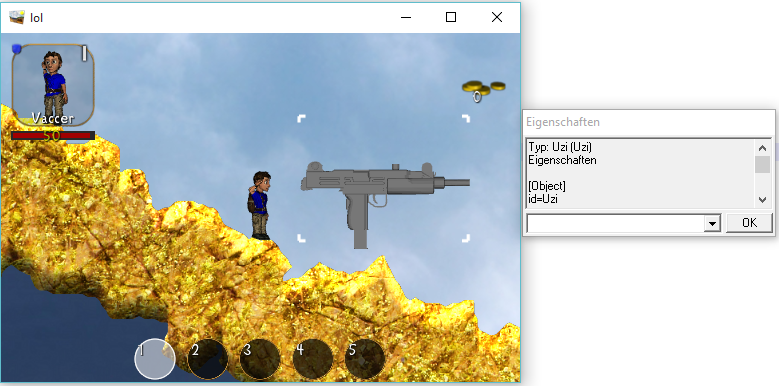
Why the object in openclonk is not beautful like in blender?
What i need to do to do object like in the blender?
http://prntscr.com/8mf86i
I am talking about the color
What i need to do to do object like in the blender?
http://prntscr.com/8mf86i
I am talking about the color
First guess: bad lighting, lower resolution, missing anti-aliasing. Other than that, it looks pretty much the same to me. You can disable some of the shadows ingame when you run the command
SetFoW(false,0) in the console (will disable the fog of war for player 0), see how that effects it.
 Can you post the contents of the .material file? You can edit these files with any text editor you like.
//UZI
material Scene
{
receive_shadows on
technique
{
pass Scene
{
ambient 0.6000000238418579 0.6000000238418579 0.6000000238418579 1.0
diffuse 0.480000026226044 0.480000026226044 0.480000026226044 1.0
specular 0.8999999761581421 0.8999999761581421 0.8999999761581421 1.0 0.25
emissive 0.0 0.0 0.0 1.0
texture_unit
{
texture uzi.jpg
tex_address_mode wrap
scale 1.0 1.0
colour_op modulate
}
}
}
}
//SHOTGUN
material Scene
{
receive_shadows on
technique
{
pass Scene
{
ambient 0.6980392336845398 0.6980392336845398 0.6980392336845398 1.0
diffuse 0.558431395268908 0.558431395268908 0.558431395268908 1.0
specular 0.5 0.5 0.5 1.0 12.5
emissive 0.0 0.0 0.0 1.0
texture_unit
{
texture SHOTGUN.JPG
tex_address_mode wrap
scale 1.0 1.0
colour_op modulate
}
}
}
}
//PISTOL
material Scene
{
receive_shadows on
technique
{
pass Scene
{
ambient 0.6399999856948853 0.6399999856948853 0.6399999856948853 1.0
diffuse 0.5119999961853026 0.5119999961853026 0.5119999961853026 1.0
specular 0.0 0.0 0.0 1.0 12.0
emissive 0.0 0.0 0.0 1.0
texture_unit
{
texture pistol_D.jpg
tex_address_mode wrap
scale 1.0 1.0
colour_op modulate
}
}
}
}
I removed these lines after "emissive 0.0 0.0 0.0 1.0" because i had errors:
alpha_to_coverage off
colour_write on
cull_hardware clockwise
depth_check on
depth_func less_equal
depth_write on
illumination_stage
light_clip_planes off
light_scissor off
lighting on
normalise_normals off
polygon_mode solid
scene_blend one zero
scene_blend_op add
shading gouraud
transparent_sorting on
material Scene
{
receive_shadows on
technique
{
pass Scene
{
ambient 0.6000000238418579 0.6000000238418579 0.6000000238418579 1.0
diffuse 0.480000026226044 0.480000026226044 0.480000026226044 1.0
specular 0.8999999761581421 0.8999999761581421 0.8999999761581421 1.0 0.25
emissive 0.0 0.0 0.0 1.0
texture_unit
{
texture uzi.jpg
tex_address_mode wrap
scale 1.0 1.0
colour_op modulate
}
}
}
}
//SHOTGUN
material Scene
{
receive_shadows on
technique
{
pass Scene
{
ambient 0.6980392336845398 0.6980392336845398 0.6980392336845398 1.0
diffuse 0.558431395268908 0.558431395268908 0.558431395268908 1.0
specular 0.5 0.5 0.5 1.0 12.5
emissive 0.0 0.0 0.0 1.0
texture_unit
{
texture SHOTGUN.JPG
tex_address_mode wrap
scale 1.0 1.0
colour_op modulate
}
}
}
}
//PISTOL
material Scene
{
receive_shadows on
technique
{
pass Scene
{
ambient 0.6399999856948853 0.6399999856948853 0.6399999856948853 1.0
diffuse 0.5119999961853026 0.5119999961853026 0.5119999961853026 1.0
specular 0.0 0.0 0.0 1.0 12.0
emissive 0.0 0.0 0.0 1.0
texture_unit
{
texture pistol_D.jpg
tex_address_mode wrap
scale 1.0 1.0
colour_op modulate
}
}
}
}
I removed these lines after "emissive 0.0 0.0 0.0 1.0" because i had errors:
alpha_to_coverage off
colour_write on
cull_hardware clockwise
depth_check on
depth_func less_equal
depth_write on
illumination_stage
light_clip_planes off
light_scissor off
lighting on
normalise_normals off
polygon_mode solid
scene_blend one zero
scene_blend_op add
shading gouraud
transparent_sorting on
>diffuse 0.480000026226044 0.480000026226044 0.480000026226044 1.0
That is the brightness - try changing it to f.e.
diffuse 1.0 1.0 1.0 1.0 for full brightness
Thanks, i did it.
I have another question:
To rotate a object in a "carry animation" i have to change this line:
public func GetCarryTransform()
{
return Trans_Rotate(-90,1,0,0);
}
But to rotate a object in a Aim animation, what i have to do?
I have another question:
To rotate a object in a "carry animation" i have to change this line:
public func GetCarryTransform()
{
return Trans_Rotate(-90,1,0,0);
}
But to rotate a object in a Aim animation, what i have to do?
There is no seperate transformation option there, that transform will be applied all the time. If you want, hack the library you're working with, and modify the
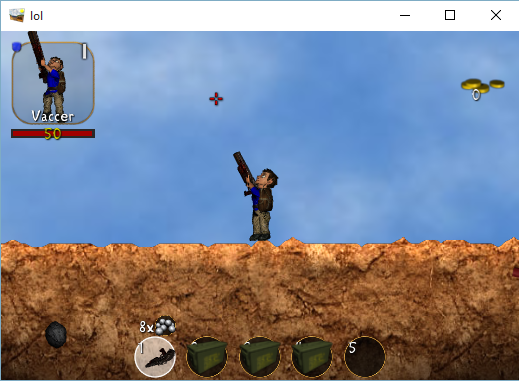
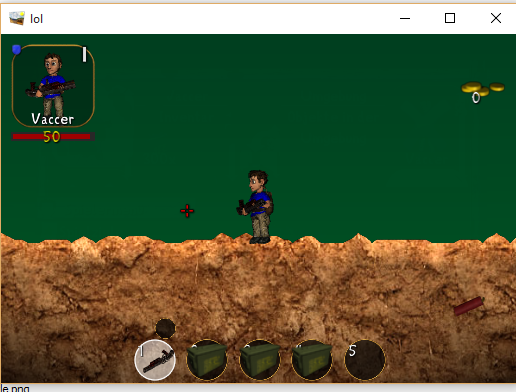
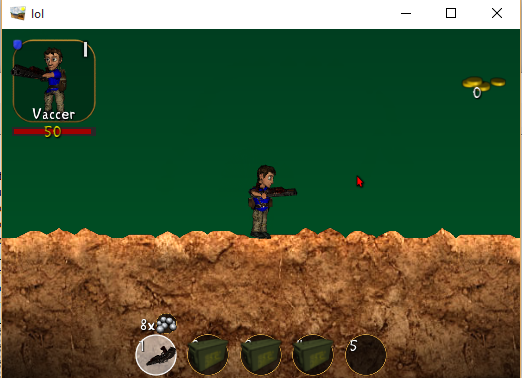
It's also correct when the gun is loaded.
Could you post some screenshots with what it looks like on your side?
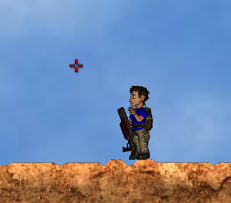
AttachMesh() calls to include some extra transformations in the places where you want them to be. Your first option should always be to correct the 3d model first. Rotating the model in blender and exporting it again is quite easy, and even a novice should find the rotate functiom. Other than that, I didn't encounter any problems with just using the GetCarryTransform() function. In your shotgun model e.g. and your script above, it does also apply the transformation when aiming, as seen here:It's also correct when the gun is loaded.
Could you post some screenshots with what it looks like on your side?
Powered by mwForum 2.29.7 © 1999-2015 Markus Wichitill
