
 I tried to do this, but it looked not nearly as good as 3d-information in the color texture. I'll try it again, after my vacation.
![[de]](/mwf/flags/de.png "Germany")
 I actually had a lot of success with putting the majority of the depth information into the normal map:
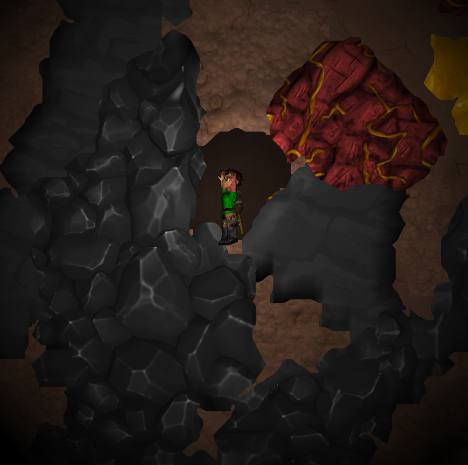
Attachment: granite.PNG (253k)
Than I'm doing that normal map stuff wrong :(But still, I can't guess what tha black material should be .
I took some of the boulders I made for the carry-heavy stuff, modified them into 3 variations and puzzled together a large patch of these rocks. Then, I made a 2x2 pattern from that patch and used the "center" where everything overlaps as texture. I then baked the normal map and ambient occlusion (= your "wash"). Another bake of the "dirty vertex color" feature from blender gave me the edge highlights which I mashed together with the AO in photoshop.
aI hereby license the file granite.png under the CC-BY license
I hereby license the file granite_NRM.png under the CC-BY license
I hereby license the file smooth_normals.png under the CC-BY license
I hereby license the file smooth_rock.png under the CC-BY license
Attachment: granite.png (193k)
Attachment: granite_NRM.png (402k)
Attachment: smooth_normals.png (1042k)
Attachment: smooth_rock.png (286k)
![[us]](/mwf/flags/us.png "United States")
 Maybe the depth coordinate of the normal map is inverted?
Clonk is using weird coordinate systems sometimes.
 I think this is more an engine problem. Seems like when there is ambient light, the materials are per default light on top and dark at the bottom (Like in CR). Look at the screenshots, in darkness it works, but in ambient light it doesn't.
")
")

> Seems like when there is ambient light, the materials are per default light on top and dark at the bottom
Yeah, that's the ambient shader.
![[gb]](/mwf/flags/gb.png "United Kingdom")
Yes - the presence of ambient light directly overrides the effect of light sources. This makes a certain amount of sense: The sun is basically assumed to be so bright that it drowns out everything else. Like in real life: Put a candle outside, and it has basically no effect. Do the same in a cave, and lights change radically. The weighting basically "compresses" the brightness range on top of that, in order to emulate our eyes adjusting to different lighting conditions.
I was a bit skeptical at first when I read the code, too, but I think it works rather well.
I was a bit skeptical at first when I read the code, too, but I think it works rather well.
Just some small issues:
The brickback material was used for an alternative tunnel style, you are currently using it as a second brick type which is odd. This should be fixed. Also sometimes you name a normal map _NRM and sometimes _nrm, this could also be made consistent.
The brickback material was used for an alternative tunnel style, you are currently using it as a second brick type which is odd. This should be fixed. Also sometimes you name a normal map _NRM and sometimes _nrm, this could also be made consistent.
I think custom shaders for materials could add a lot of sugar to this. Especially crystal (or whatever) and gold could be made really shiny. Instead of getting "dark" on the shadow-side of the normal map, crystal material could change its color to a saturated green or blue (or both) in the shade, to give the illusion of some translucency.Sand and earth, given their rough nature, could benefit from a more dull shading instead.
> I think custom shaders for materials could add a lot of sugar to this.
It would probably be a major effort to allow this. It would require the landscape to be drawn in multiple passes, with one pass for each shader. Would also have implications for landscape rendering performance...
Which is often exactly as expensive as having a numerical material property for whatever you're interested in (shinyness? transluency?). I would prefer that route.
Which, btw, shouldn't keep anybody from experimenting with it. If somebody wants to test landscape shader effects, just put a suitable
if-branch checking materialIx into LandscapeShader.c (predicting the material index might or might not be a bit guesswork though). I'm a bit skeptical whether there's really a lot we can gain from this, but would love to be proven wrong.
Could you clarify what will happen with these materials now? Are you still working on them? Did you release them under CC-BY or compatible? Can we commit to the repos? Or did you commit to some Milestone-internal repos anyway and there will be a big pull request at some point?
A pull request would be suboptimal if we don't do quality checks on the milestone repos.
Yes, I'll continue to work on the materials, after my vacation, which begins on thursday. They will be comitted when we are all happy with them.
To aggregate the work done on this, it'd be nice if the current version could go into the repository somehow. I worked on granite, and I dont want to put all the files up in the forums D:Edit: Oh, Sven was faster. :)
The psds are all on Dropbox, this should be enough to play around.

 Imo the turquoise or the brighter purple (before the pinkish color).
So I guess you have a different normal response in mind? Right now, we have essentially (ignoring culling, which doesn't matter for the landscape):
What you have in mind is probably simply:
If you want "sharper" spotlights you could even use something like:
Actual reflection would involve different maths: "Incoming angle = outgoing angle" would suggest that the light source being right in front of the material should *not* cause reflection. So maybe something like
Could cause interesting light effects. All untested, mind you :)
float light = 2.0 * lightBright * max(dot(normal, lightDir), 0.0);What you have in mind is probably simply:
float light = 2.0 * lightBright * max(dot(normal, lightDir), 0.5);If you want "sharper" spotlights you could even use something like:
float light = 2.0 * lightBright * pow(max(dot(normal, lightDir)), 0.7), 2.0);Actual reflection would involve different maths: "Incoming angle = outgoing angle" would suggest that the light source being right in front of the material should *not* cause reflection. So maybe something like
float reflect = max(1.0 - abs(0.8 - dot(normal, lightDir)), 0.7);
float light = 2.0 * lightBright * pow(reflect, 2.0);
Could cause interesting light effects. All untested, mind you :)
I played around with what Peter suggested above and turned on a few knobs in the shaders.
Disclaimer: I have absolutely zero idea what I am doing. My shader code is a huge mess and my normal map is not "correct" as I just eyeballed some normal-map-like colors in photoshop. I do not even know if the shader would look ok if the normalmap was acutally correct. Best is to take this as a proof of concept.
By popular demand, here is what I am doing. Mind that my version somehow even crashes during shader compilation, so I had to comment it out until the game was running. I seriously don't know how I even shader.
slice(light) {
  if (f2i(landscapePx.r) == 189) {
  float reflect = max(1.0 - abs(0.8 - dot(normal, lightDir)), 0.6);
  light = 3.0 * lightBright * pow(reflect, 2.0);
  }
}

slice(color) {
  if (f2i(landscapePx.r)  == 189) {
    float reflect = max(1.0 - abs(0.8 - dot(normal, lightDir)), 0.7);
    float light = 2.0 * lightBright * pow(reflect, 2.0);
    float r = pow(light, 3.0);
    float g = 0.5 + light/2 + pow(light, 2.0)*0.8 + color.rgb.g;
    float b = 0.5 - light + pow(light, 4.0)*0.6 + color.rgb.b;
    color.rgb = vec3(r, g/2, b);
  }
}
Edit: important: I disabled the material light for amethyst
I hereby license the file amethyst_NRM.jpg under the CC-BY license
Attachment: amethyst_NRM.jpg - People who knew what they were doing with normal maps would cry if they saw this (56k)
To get it to work just make that:slice(light+2) {
if (f2i(landscapePx.r) == 189) {
float reflect = max(1.0 - abs(0.8 - dot(normal, lightDir)), 0.6);
light = 3.0 * lightBright * pow(reflect, 2.0);
}
}
slice(color+1) {
if (f2i(landscapePx.r) == 189) {
float reflect = max(1.0 - abs(0.8 - dot(normal, lightDir)), 0.7);
float light = 2.0 * lightBright * pow(reflect, 2.0);
float r = pow(light, 3.0);
float g = 0.5 + light/2 + pow(light, 2.0)*0.8 + color.rgb.g;
float b = 0.5 - light + pow(light, 4.0)*0.6 + color.rgb.b;
color.rgb = vec3(r, g/2, b);
}
}
 Mhh yes, the normal map is quite wrong. Since it is a pattern that is not too complex, perhaps you could model a heightmap for it in blender and bake that heightmap into a texture? The effect of a correct heightmap though could very well be that your test doesn't look as magic anymore. But I think graphical effects should be developed with correct data.
Nice! Instead of the hardcoded 189, we could have the engine generate
#define MATERIAL_XXX constants for all materials when generating the landscape shader. Or, like Peter suggested, introduce a set of material properties that allow to achieve this effect and which are then applied to all materials.
I would definitely suggest a material property - highly likely we want this kind of thing in different strengths for a good number of materials. Things we could parameterise here:
1.
2. Point of highest reflection
3. Luminosity?
Here's what I get trying to refactor Matthi's code:
Now I'm going to assume for the moment (any objections?) that we don't want the material to shine through the FoW. Setting
I approximated the
At which point we have broken the whole thing down to just a few numbers that we could easily set per material. However, a few troubling things: Normally "tex" is what we get from the texture, not the luminosity (?) part. In this case, we especially completely ignore the red part of the colour. Personally, I would prefer if we could break it down into something like:
That's roughly what I would suggest. All factors previously on "
1.
pow exponent2. Point of highest reflection
3. Luminosity?
Here's what I get trying to refactor Matthi's code:
    float reflect = max(1.0 - abs(0.8 - dot(normal, lightDir)), 0.7);
    color.r =                                                8.0 * pow(lightBright, 3.0) * pow(reflect, 6.0);
    color.g = 0.25 + 0.5 * lightBright * pow(reflect, 2.0) + 1.6 * pow(lightBright, 2.0) * pow(reflect, 4.0) + 0.5*color.g;
    color.b = 0.5  - 2.0 * lightBright * pow(reflect, 2.0) + 9.6 * pow(lightBright, 4.0) * pow(reflect, 8.0) + color.b;
Now I'm going to assume for the moment (any objections?) that we don't want the material to shine through the FoW. Setting
lightBright = 1 (hm, maybe 0.8?) and re-introducing it as a linear factor doesn't change the lights in the FoV, and gives us: float reflect = max(1.0 - abs(0.8 - dot(normal, lightDir)), 0.7);
color.r = 8.0 * pow(reflect, 6.0);
color.g = 0.25 + 0.5 * pow(reflect, 2.0) + 1.6 * pow(reflect, 4.0) + 0.5*color.g;
color.b = 0.5 - 2.0 * pow(reflect, 2.0) + 9.6 * pow(reflect, 8.0) + color.b;
color = lightBright * color;I approximated the
pow sum curves to get just a single pow, which allows us to write the whole thing as: float reflect = max(1.0 - abs(0.8 - dot(normal, lightDir)), 0.7);
vec3 tex = vec3(8.0, 2.1, 6.5);
vec3 lum = vec3(0.0, 0.25, 0.5) + color * vec3(0.0, 0.5, 1.0);
vec3 pw = vec3(6.0, 4.0, 8.0);
color = lightBright * (tex * pow(reflect, pw) + lum);At which point we have broken the whole thing down to just a few numbers that we could easily set per material. However, a few troubling things: Normally "tex" is what we get from the texture, not the luminosity (?) part. In this case, we especially completely ignore the red part of the colour. Personally, I would prefer if we could break it down into something like:
    float reflect = max(1.0 - abs(0.8 - dot(normal, lightDir)), 0.7);
    vec3 lum = vec3(0.0, 0.5, 1.0);
    vec3 pw = vec3(6.0, 4.0, 8.0);
    color = lightBright * color * (pow(reflect, pw) + lum);
That's roughly what I would suggest. All factors previously on "
tex" should be baked into the material texture in this scenario.
 Looks amazing =D
Looks nice indeed, there is a bunch of pixels in the granite that behave strangely, is this a bit of amethyst material?
Nice, proven wrong right away. Btw - does the shader apply to the Clonk's face too? What is going on there? o_O
Very nice. I thought the shader thingy is out of reach, but nice to see some action. I'm not a big fan of the green shimmer though, looks like smaragd to me.Also, Diamondium for the name would be great *shaking fist of anger* .
[Edit]
Maybe you can do some unicorn-code-magic on the gold, too!
Added now? Just wanted to drop in to say: Looks good. If this is the new style, we might want to raise
Also this might have been lost a bit - but alongside the shader reorganisation every material now has three new properties that determine how it reacts to light. So far, I only changed it for Gold:
normalMapStrength to 0.3 or 0.4.Also this might have been lost a bit - but alongside the shader reorganisation every material now has three new properties that determine how it reacts to light. So far, I only changed it for Gold:
LightEmit=0,215,255
LightSpot=64,64,64
LightAngle=220
LightEmit makes the material "emitting", which is basically normal-independent lighting ("glow"?). The higher LightSpot is, the sharper the light response in a particular color channel. Finally, LightAngle changes the angle at which the material reflects the light the most - 255 is normal, lower values mean that the light will reflect most when the light source is a bit away.
Feel free to adjust the setting in any way you like.What would be necessary to have that same effect Matthi showed in here for crystal?
It's not quite immediately comparable. According to my calculations above, it should be something like
Because for
LightEmit=0,127,255
LightSpot=96,64,128
LightAngle=204
Because for
LightSpot, 16 is 1.0 and for LightAngle, 255 is 1.0.
For me, material lighting is completely wrong at the moment. See bugtracker: http://bugs.openclonk.org/view.php?id=1418It feels like everything except ore disregards the clonk light source completely.
Yes, noticed that too. My working hypothesis is that the border normals and the texture normals mix differently depending on how much the material normals vary. Therefore the borders look huge on flat materials, but disappear on very structured textures. Maybe "mix" isn't the right approach here after all.
This is probably not causing this problem, but if you mix two (normalized) normal vectors, they are not guaranteed to be normalized afterwards. But the shader doesn't seem to renormalize them.
Powered by mwForum 2.29.7 © 1999-2015 Markus Wichitill
